Permittivity and Permeability of Materials Obstacle Course
Contents
- 1 Permanent Materials
- 2 Materials to Borrow When Necessary
- 3 Activities
- 3.1 Reading
- 3.2 Capacitance Techniques (Below 10MHz)
- 3.3 * Permittivity of a Lossless Material From a Capacitance Measurement
- 3.4 * A Better Permittivity-Capacitance Measurement of a Lossless Material
- 3.5 * Permittivity of a Lossy Material From a Capacitance Measurement (up to 10 MHz)
- 3.6 * Permittivity of a Lossy Material From a Capacitance Measurement (up to ~ 500 MHz)
- 3.7 Transmission Line Techniques (above 500 MHz)
- 3.8 Waveguide Techniques (above 500MHz)
Permanent Materials
- 6061 3/8" Al rod stock
- Teflon
- Glass microscope slide
- HP Signal Generator (DC-1 GHz)
- Oscilloscope (at least 1GHz bandwidth)
- Miscellaneous electrical components
Materials to Borrow When Necessary
- Milling machine
- Lathe
- RF Lockin
- Active Probes
Activities
Reading
- Read the Wikipedia articles on permittivity and permeability. With the help of the instructor or TA try to achieve a physical understanding of just what the permittivity and permeability mean in a bulk material.
- Read the first three sections of this paper (pages 1-27). Pay particular attention to the permittivity () / capacitance and permeability () / inductance associations.
Capacitance Techniques (Below 10MHz)
* Permittivity of a Lossless Material From a Capacitance Measurement
- Place three samples (air, Teflon, glass) between the aligned and polished ends of two 3/8" diameter, 1/2" lengths of 6061 Al rods (as shown at right). should be on the order of 1 mm. Measure the capacitances and, from the known surface area and spacing , determine the material's relative permittivity. (for a capacitor with no fringing fields).
- How do your measured permittivity values compare to standard reference values?
- Use this web applet to build a capacitor and observe the field lines . Are there fringing fields?
(air): 1.000536
(Teflon): 2.1
(glass): 3.7-10
* A Better Permittivity-Capacitance Measurement of a Lossless Material
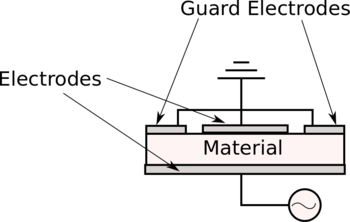
- Use this web applet to build a guarded-electrode capacitor (as shown at the right) and observe the field lines . Are there fringing fields?
- Measure the three permittivities (air, Teflon, glass) again using this guarded-electrode setup.
- How do these results compare to your first (unguarded) measurements?
- How do these results compare to the standard values?
The measurements above for a lossless material amounts to requiring the permittivity to be real (as opposed to complex). However, for a lossy material, the permittivity is complex and we need an additional characteristic (beyond simply the capacitance) to characterize the material. This additional characteristic is the conductance . The measurement below will include the conductance of the material.
* Permittivity of a Lossy Material From a Capacitance Measurement (up to 10 MHz)
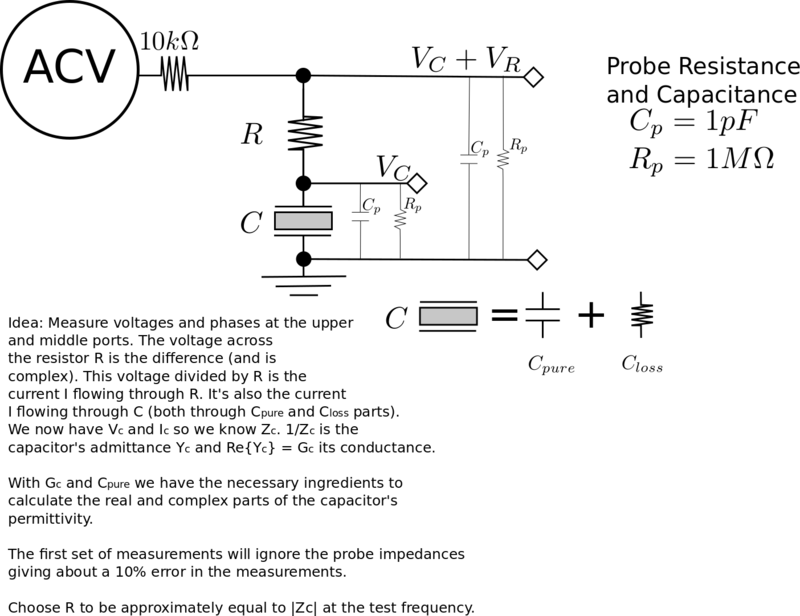
- Employ the guarded-electrode setup above and measure the lossy material's capacitance and conductance . and , where are, respectively, the real and imaginary parts of the complex permittivity.
- Simultaneously measure the voltage and phase across the resistor and capacitor .
- The current through the capacitor is given by . The voltage across the capacitor is given by , where is the capacitor's impedance. Solve for the impedance .
- The capacitor's admittance is given by , where the (the conductance) and the (the susceptance). Calculate .
- Read section 13.1 (pages 106-107) in this [paper].
- Calculate the relative permittivity as and .
- Do the above procedure for three frequencies at 0.1 MHz, 1MHz and 10 MHz.
- Plot and as a function of frequency.
Beyond 10MHz lumped circuits become non-ideal (resistors start exhibiting capacitive and inductive effects - analogously with capacitors and inductors - even plain wires). So, to go beyond 10MHz, we need to consider how the lumped-component model fails for determining the permittivity. We can put the RC voltage divider circuit on a ground-plane surface-mount PCB for higher frequencies or move to the transmission-line method or the waveguide method (next three sections below).
* Permittivity of a Lossy Material From a Capacitance Measurement (up to ~ 500 MHz)
small surface mount components on a ground-plane PCB...
Transmission Line Techniques (above 500 MHz)
coming soon...
Waveguide Techniques (above 500MHz)
coming soon...


