The Darkroom
Contents
Print to Film
The photo center requires that you either know how to use a chemical darkroom already or that you take an introduction course.
Access to their chemicals is $10 per quarter or $2 for a day. They don't take index numbers but you can be reimbursed.
Before you go to the darkroom you will need lithographic film, latex gloves, lithographic developer parts A and B (these each come in a separate bottle), and your paper negative print of your PCB. Everything else you need can be found in the craft center.
The lithographic film is kept in an envelop and a black film jacket; this film will become useless if it is exposed to light (except red/yellowish lights in the dark room) so never open the film container outside the darkroom. Continue reading for how to properly handle the film in the dark room.
The lithographic film developer comes in two bottles, part A concentrate and part B concentrate and the two parts will be mixed at the time of development. Part A is a dark purple color and part B is clear.

In the darkroom, keep the lights low and let your eyes adapt.
Prep and setup
- Lay out chemical trays: developer, stop bath (water), fixer, hypowash.
There free-to-use containers of fixer and hypowash (hypoclear) in the cabinets labelled "Open Use Chemicals". These cabinets are located on the right side of the small hallway as you walk in through the door of the dark room (the hall between the door and the curtains). In this cabinet you will also see containers of "Stop", don't use this chemical for the stop bath, just use water.
The developer comes in two parts (A and B). Per the instructions on the bottles, mix 100ml of Part A concentrate to 300ml of water. Then separately Mix 100ml of Part B to 300ml of water. Disregard the nonsense about 68*F -as long as the temperature of the AB mix is in the vicinity of 80*F before development you are okay. It was found that just diluting the concentrates of A and B with hot water straight from the darkroom's hot tap worked quite well with the still fridge-cold concentrate. Pour the water mixed with A into the tray, then the mix of B and water into the same tray. Then wash the beaker thoroughly (water/agitate/dump 3x). Once mixed, the developer apparently has a frighteningly short useful lifetime - order of a few hours - which is why it comes in separated bottles.
The developer tray should be floated in a second tray containing hot water as thermal ballast. If the tray of developer is left on the cold metal table the developing liquid will quickly cool below working temperature. The target temp is around 80*F... 75*F is too cold, 85*F or more will be too hot. As an added layer of thermal protection you can flip over an empty tub on the metal table, place your hot water bath on the flipped over tub, and place your A/B mix tray in the hot water bath. This way the table will not cool the bath.
Next you will want to set up a stop bath, the fixer, and the hypowash. Fill one tray with water (this will be your stop bath), then fill one tray with Fixer (this will be in a labeled container in the dark room), and fill one tray with hypowash (this is a container labeled Iypoclear). The photo below shows 3 of the 4 contianers (the water stop bath is not shown).

Contact Printing
- Next, prepare the contact print setup. You need two 8x10 glass sheets from two normal contract printing beds, to make a glass-film-paper-glass sandwich. Glass is very flat and must be used to ensure the maximum retention of detail. There should be flat sheets of glass in the dark room but it may require some searching to find them.
- Prepare film to approximately the size of your art. We have 8x10 inch film sheets, so that it is natural to cut each down to four 4x5 inch pieces if this can accommodate your art. There is a paper cutter in the corner of the dark room behind a curtain. When cutting, don't be afraid to have some spare border so the film can easily be handled after without getting fingerprints on the art itself. You will also need test strips of Lithographic film to confirm the correct exposure. Check the film jacket for existing cut-down pieces before getting out another 8x10 sheet.
All film that is not this very second being cut, exposed or developed must be stored in the black film jacket and returned there promptly between cutting and exposure. Never take more than one sheet out at a time. The orange safelight will not expose it quickly, but the safelight and stray light from the enlarger will expose it eventually and this mal-exposure (known as fogging) is undetectable until the film is developed. Wear gloves while handling the film to avoid getting filthy dirty meatpaw marks all over it (a glove will be needed during development anyway). To the greatest extent possible, handle the film by its edges.
The film has a back and an emulsion side. The emulsion side is allegedly pinkish, which is spectacularly useless to know given that it can only be viewed in a darkroom under red light. The best way to tell the difference is by "tasting" the edge of the film with your lips. The emulsion side feels unsmooth/tacky while the anti-halation backing of the far side feels smooth. Always make sure that the emulsion side is up when exposing!
Thus, the layers for the exposure process should be a sheet of glass, the film (emulsion side up), the paper print (ink side down), and another sheet of glass.
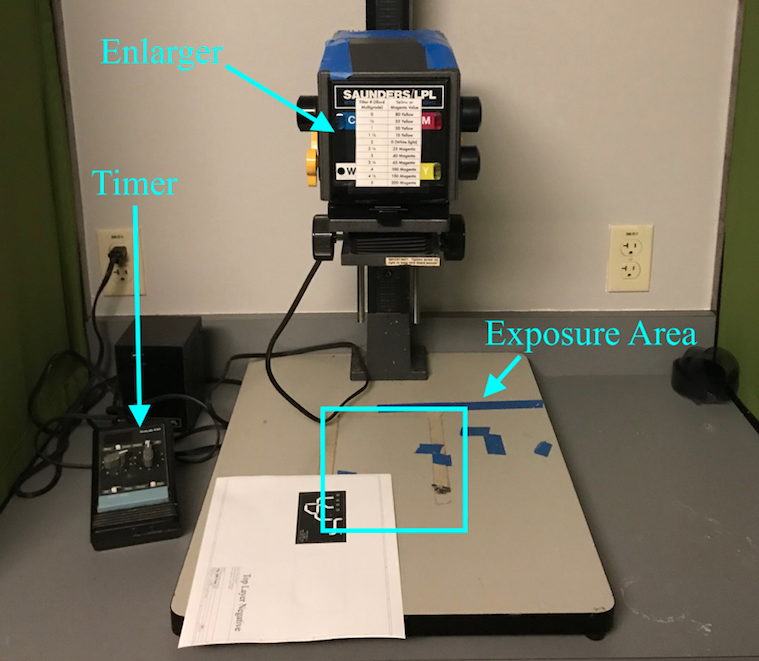
The light source for your exposure will be the enlarger. An enlarger is commonly used to enlarge 35mm negatives, but you already have a paper negative so the enlarger will just act as a timed flashlight. A picture of the enlarge can be found below. You will place your glass-film-paper-glass sandwich under the enlarger and use the timer to vary the exposure time. The light will turn on for that amount of time and then turn off automatically. The enlarger has multiple color capabilities and is adjustable. Set the enlarger to white by flipping the "W" switch up, which ensures the light is white. Next, adjust the lens distance (essentially the focus) until the enlarger produces a uniform area of light that will cover your print. If the light is not uniform over the whole area of the print the film will not develop evenly.

Make Test Strips
Test strips are used to determine the ideal exposure time for your film and are made by contact printing a strip of film with different exposure times. To test the different times you will set up a contact print with your paper negative and test strip, then cover 4/5 with a light blocking material (thick cardboard or plastic) and expose 1/5 of the strip for 5 seconds. Next you will move the light blocking material to reveal 2/5 of your strip and expose the strip for another 5 seconds. You will repeat this process by covering less and less of your strip until the whole strip is exposed. This results in a strip having 5 different exposer times (the first 1/5 having 25 seconds of exposure while the last 1/5 only having 5 seconds of exposure). This image demonstrates how the variations of exposure times will affect an image and how the test strip should look with regards to 5 different exposure areas.
To make your strip cut a small strip of film paper (an inch wide and about 5 inches long) and place this under the enlarger. Exposure time depends somewhat on enlarger head height and strongly on developer temperature (development is a thermodynamic process and is exponential in temperature). With an empty 35mm film holder in the enlarger, all color filters set to neutral, the lens aperture fully open, and the enlarger head moved down so that the image is about 11 inches wide, begin exposing the film for 5 second increments.
Follow the steps below to develop this test strip and determine which exposure time yields the best results. The ideal exposure time will result in completely clear regions where the paper negative was black and completely black regions where the paper negative was white. The black is black enough if you can hold the developed test strip up to a bright light and not see any light through the black regions.
Chemical Development Process
1. Developer (2-5 minutes)
2. Stop Bath (30 seconds)
3. Fixer (5 minutes)
4. Hypowash (5 minutes)
5. Rinse
6. Clean Up (developer and hypowash can be poured down the drain with water, fixer should be poured into the a container labelled "Spent Fixer" which can be found in the dark room). Also be sure to rinse out all containers used.
Technical Information
Normal photographic development is designed to convert a continuous range of light exposures into a continuous range of densities on the film or paper. This process generally has a roughly linear dynamic range of between 100 and 1000 to 1 separating "black" and "clear" (papers being nearer to 100 and films to 1000). At extremes of over- or under-exposure, the transfer function graphing optical density vs exposure saturates, resembling a graph of arctan(x). The steepness of the linear region defines the contrast level of the film, and is affected by both the film itself and the development process used.
In the normal, modern, black & white photographic development process, photons have reduced tiny amounts of silver halide in the film surface to silver metal. Within each grain, the developer converts silver metal to black silver oxide such that the darkness of a grain is proportional to how much light it received.
In the lithographic process, this normal process is augmented with positive feedback: Both silver AND silver oxide contribute to the development process. Obviously this results in exponential runaway, as a grain that develops at all will quickly turn completely black.
Photographic artists manipulate the lithographic process to produce exotic image tones (generally by gross overexposure, followed by great underdevelopment, such that the exponential runaway proceeds only to the point of producing an intriguingly nonlinear response curve), but we are interested in its "intended" property: The production of incredibly high contrast (10000:1) images with incredibly high resolutions (resolvable features on the micron scale).
For any given amount of exposure E, a given development process will result in an output film optical density D(E). For the halftone process, done correctly,
.

The contrast ratio of the printed image on paper is remarkably low when backlit - maybe 10, as opposed to over 100 viewed in diffuse reflective light - and suffers considerable fluctuations due to the random fiber packing of paper causing the transmission of "clear" areas to fluctuate considerably.
Thus the range of acceptable exposures, meaning those for which all black areas get E < E_crit and all clear areas get E > E_crit, is not nearly so wide as might be imagined.
Furthermore, the brightness of the light rectangle supplied by the enlarger experiences a nontrivial (~20%) decrease towards its corners, further eroding exposure margin.
This will demonstrate itself on test strips: If an exposure of 12 seconds works, most likely 6 seconds will result in a very weak image and 18 will blacken everything.
Development time should be roughly 2-5 minutes. Put the film into the developer emulsion up, as it was exposed. With a glove or tongs, agitate continuously for 30 seconds, then 5 seconds every 30. The film should quickly turn whiteish, and the shadow of an image should begin to darken within about 30 seconds. If it does not, either exposure was insufficient or the developer is cold.
Note that photographic development is a diffusion-limited process: The developer exists in the bulk fluid, but image formation occurs at a semi-infinite plane surface. This means that fluid agitation is *ESSENTIAL* to the process.
Overexposure with underdevelopment (Less than 2 minutes in developer) will be associated with clear areas exhibiting a continuous-tone brown muddiness, which is not OK for us (but is typical of what artistic lith printers are after). Underexposure with overdevelopment (over 4-ish minutes in developer) will be associated with waiting for the exposed areas to finish turning fully black when suddenly black dots begin to appear in clear areas.
If the developer is not legit warm through the glove, it is too cold. Floating the developer tray in a second tray filled with a thermal ballast of hot water will maintain its temperature for longer.
After developing, grab the film (either with tongs or glove) and wash it for 30 seconds in the stop bath (water) with continous swishing. This halts the development process, but the film is still photosensitive.
After placing the film in the fixer and agitating, almost immediate clearing of the substrate from white to transparent should occur. The fixing process takes about 5 minutes with intermittent agitation. As its name implies, the fixer "fixes" the image: It disintegrates and dissolves the remaining silver halide, leaving only the black silver oxide created by the developer.
After fixing, the film needs to be washed in hypowash to assure long-term stability of the photographic substrate. Around 5 minutes is sufficient, but more is not harmful. Agitate occasionally. Hypowash lets the fixer molecules diffuse out of the film, and also neutralizes any remaining acids that would slowly damage the substrate.
After hypowash, the film can be left in a final bath of plain water until all images are done.
Once fixed and washed, dry the film immediately by GENTLY enfolding both sides with a paper towel and pressing (not rubbing) to absorb most of the water. This directly removes the water and avoids the need to use a wetting agent and spend a long drying interval (don't let photographers see you wipe it with the paper towel, they may have heart attacks). The film's surface will still be "wet" like skin after washing dishes, and like wrinkled fingers the absorbed water will need time to evaporate out.
Now the film can be taken to normal room lights and inspected. Key points to check include optical density (it should be nearly impossible to see even direct fluorescent tubes through the black regions), and speckling (development of individual black grains in nominally unexposed regions, indicating overexposure/overdevelopment). It also goes without saying, the image should be unimpeachably finer than the unaided eye can resolve.
If the image is acceptable, clean the darkroom up, make certain the film bag is completely closed and put away, put the developed image in a negative sheet and you're done.
The following image demonstrates the transformation from digital image, to printed image, to photographic film:

This is from a resolution test art. Six denotes that the array of vertical traces are 6 mils wide, while 12 and 15 denote that their centers are spaced by 15 and 12 mils. In terms of what might be sent to a commercial fabricator, 6 mil traces on 12 mil centers is middle of the road.
The right image is the "perfect" digital original, vector art rasterized at 600dpi. The middle panel is a photomicrograph of the paper output: As part of the resolution limit process, the toner demonstrates a clear preference to smear from black into areas that should be clear.
The left image is a reflection photomicrograph of the lithographic film, which exhibits contrast vastly inferior to a transmission image. Testing in the UV exposure chamber using a power meter found that when clear areas transmitted a measured power of 200uW, bulk opaque areas transmitted approximately 20nW: The clear/black contrast ratio exceeds 10000:1.