Superconductivity
Contents
- 1 Superconductivity Project
- 2 Experiment Guide (Colorado Superconducting Kits)
- 3 Lab One: Meissner Effect
- 4 Lab One:The Josephson Effect (V-I Curve)
Superconductivity Project
Experiment Guide (Colorado Superconducting Kits)
As an introduction to superconducting system, three experimental guides were worked through to demonstrate different properties of super conductors. Below were the experiments conducted, before advancing to the mr. SQUID kit.
Lab One: Meissner Effect
Definition: The expulsion of magnetic flux when a material becomes superconducting in a magnetic field. If the magnetic field is applied after the material has become superconducting, the flux cannot penetrate it.
The goal of this first lab is to show that this is true.

Observations: As the system dips below the critical temperature the magnet levitates. The magnet can then be sent into rotation, which in a perfect environment would rotate forever due to its frictionless property. The system increases in temperature due to the room, and will no longer levitate once it passes the critical temperature.
Lab Two: Resistance versus Temperature and Critical Temperature
As an extension to lab one, this experiment demonstrated the critical temperature of the system.
The critical temperature by measuring the Meissner effect was at 112 Kelvin.

Observations: As the temp begins to increase the magnet seems to float lower, as it reaches contact with the superconductor is when we know it has hit the critical point.
Lab Three: Measuring Resistance Versus Temperature and Critical Temperature
By measuring the electrical resistance as a function of temperature. We will have an insight to the Critical Temp, Critical Current Density and the Critical Magnetic Field.

Observations: The system remains constant initially as we submerge the the superconductor the voltage probe voltage read out abruptly increases. The system remains constant initially as we submerge the the superconductor the voltage probe voltage read out abruptly increases. The critical temperature was about 117 Kevin.

Lab Four: Determining the Critical Current Density
By using a current source we will be able to measure the current densities as we make adjustments to the current source. We setting the current through the probe from a range of 0.1-0.5 Amps, data points were collected at its critical temperature. The approximate adjustment to the current resulted in a ratio of critical temperatures.

Observations: The curve was extrapolated to 77 kelvin to find the Critical current. I(critical)=1.09 A.

Lab Five: Determining Induced Current using Superconducting Toroidal Ring
We lock a current in the toroid by reaching its critical temperature in the presence of a magnet. Using a compass needle we measure the magnetic field of the toroid by the needle’s attraction.

Thus we can measure the Induced current.

Lab Six: Determining the Critical Temperature with the Susceptibility Probe
By using the Superconducting Magnetic Susceptibility kit, the experiment will measure the magnetic susceptibility. The idea is that when a current is introduced the coil it will generate a magnetic field thus by expulsion of the superconducting sample it will create a change in the inductance of the coil.

Observations: As the sample reaches the critical temperature, the voltage increases very quickly. The system hits goes flat again once it reaches about 125 Kelvin.
Mr. SQUID
Mr. SQUID is a Superconducting Quantum interference device. The build contains a superconductor and sensor chip which is hooked up to an adjustable control box. The sensor chip is designed to be immersed in liquid nitrogen and measured by an oscilloscope. Thus after completing the kits, Mr.SQUID will be used to demonstrate more complex properties.
Lab One:The Josephson Effect (V-I Curve)
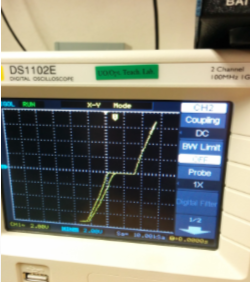

The flat part is known as the Critical current. This part is resistanceless, thus as the voltage increases through this point the current is constant.
I=2.8 mA
The normal state resistance is determined by the slope. It is the resistance above critical temperature.
R=0.6 milliOhms
V(characteristic)=I*R=1.728 uV
Lab Two: V- Flux Characteristics

Here we see the Voltage fluctuations due to the screening currents’ dependence on the applied magnetic flux. This is periodic.
Thus Change in V = 4uV
Lab Three: Resistance vs Temperature
By introducing a silicon diode into our system we attempted to measure the resistance vs temperature of the superconducting chip. In our attempted we were required to create a constant current supply that outputs 10 microamps. A current was built but was unsuccessful in making the correct measurements.
Troubleshooting: Current output, rewiring the diode, adjusting the position of the diode, connection adjustments