Observational Astronomy
Observational Astronomy
Observational Astronomy Web Page
This wiki will give a full explanation on how to use the Celestron CPC 800, and how, through the use of the native GPS tracking software within the telescope as well as the computer program Stellarium, one can observe various planets and stars. The first step is grabbing the needed components. You'll need the telescope and telescope stand, the Celestron Visual Back and star diagonal, or Orion Flip Mirror. These two components are shown below.


You'll also need an observing lens. We have two a 24mm and 6.7mm Meade. Those are shown below.


You'll also need a com port cable shown below to hook up the telescope with the computer.


Lastly you'll need a computer with the Stellarium program installed, two extension cords, and a cart to roll everything on.
Next you need to find an area with a large viewing angle with a plug-in nearby. There are a few decent locations right around Willamette. Transport all your gear to that area, and begin setup of the telescope stand. To start widen the base, then unscrew the nut holding the bottom support, then twist the bottom support so that the stand legs rest in their slots, then rescrew in the nut, pushing the bottom plate tightly against the legs. Snapshots of this process are seen below.


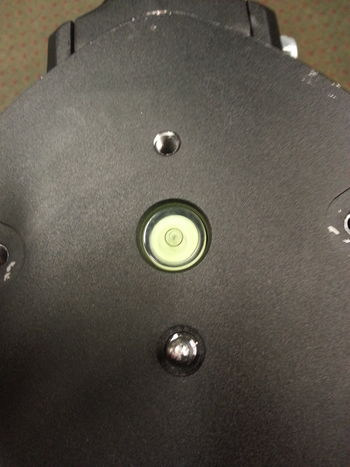
Next you'll need to level the telescope stand. It is absolutely necessary that you level it as best as you can, otherwise the star tracking will be slightly off. The level is directly on top of the stand and can be adjusted by raising and lowering the leg extensions. The level is shown below.

The next step is to attach the telescope to the stand. The telescope sits directly in the center of the stand. You may need to turn the telescope to get it to drop and lock into place. There are 3 locking screws on the underside of the stand which screw into and brace the telescope.


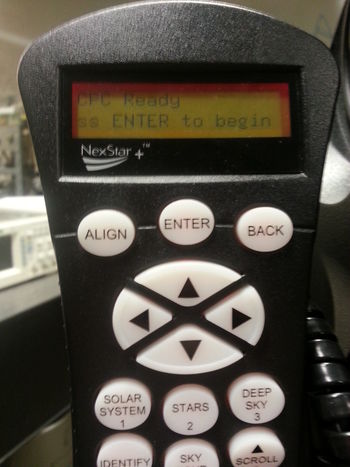
The next step is to plug everything in and align the telescope using the the SkyAlign feature of the telescope. When you turn on the telescope it should first acquire a GPS signal then it will ask to align the telescope. Hit enter and it will give you some ways to proceed with alignment. SkyAlign is by far the best for precision, but if you're looking for quick and easy alignment use the One-Star alignment technique. To proceed with SkyAlign click enter, and it will ask you to focus on a bright star and using the finderscope do rough alignment. Pick a bright star and place it in the center of the finderscope, then when satisfied click enter. It will now ask you to do precise alignment using the eyepiece. Center the star in the eyepiece and click align. It'll ask you to do this for two more stars. The key in this process is to pick stars furthest away from one another. Once you have 3 stars aligned the telescope will ask you to confirm your choices, press enter and it will triangulate the telescope position and what direction its facing. It should say alignment success, and now you'll be able to observe and track stars and planets as they move through the night sky. This entire alignment procedure is done with the hand control and is outlined step by step on the display.

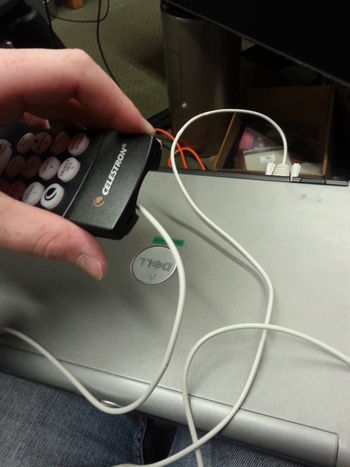
Next hook up the computer to the hand control on the telescope using the com port cable. The connection locations are shown below.

With that done, boot up Stellarium on your computer and locate the telescope icon on the bottom toolbar.
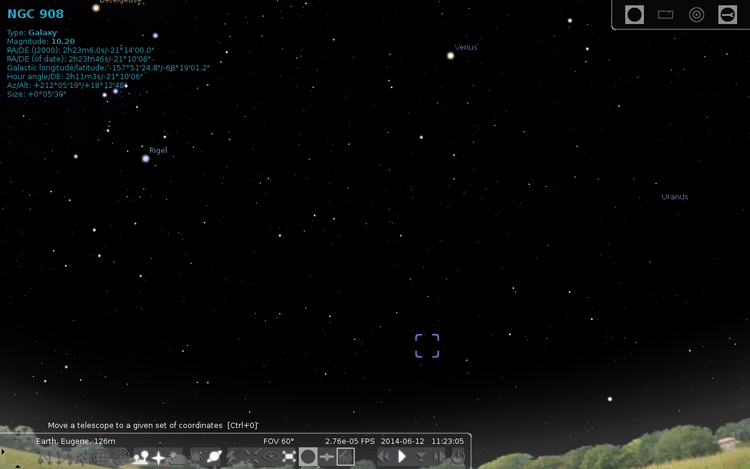

Once you've clicked on that a pop-up should appear. Click on the "Configure Telescope" button.
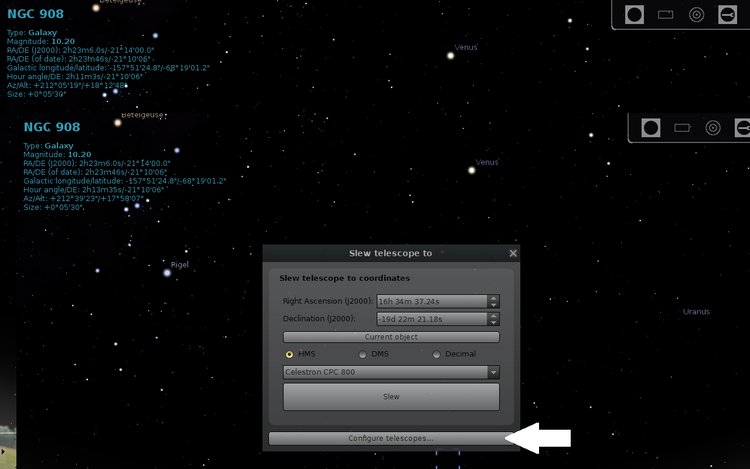

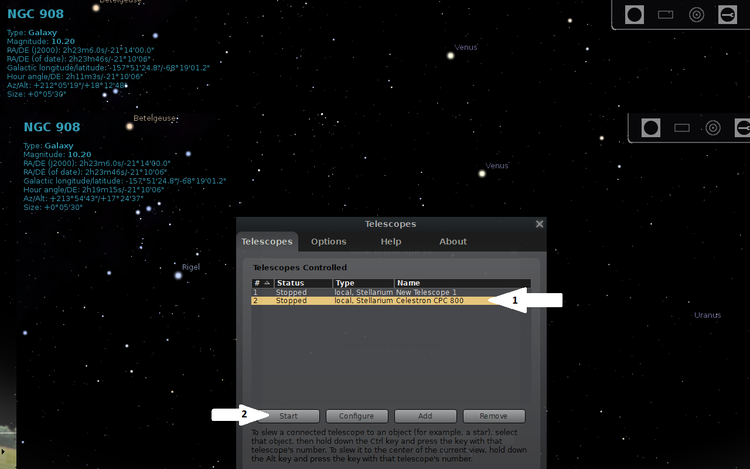
Next click on the "Celestron CPC 800" and click "Start".

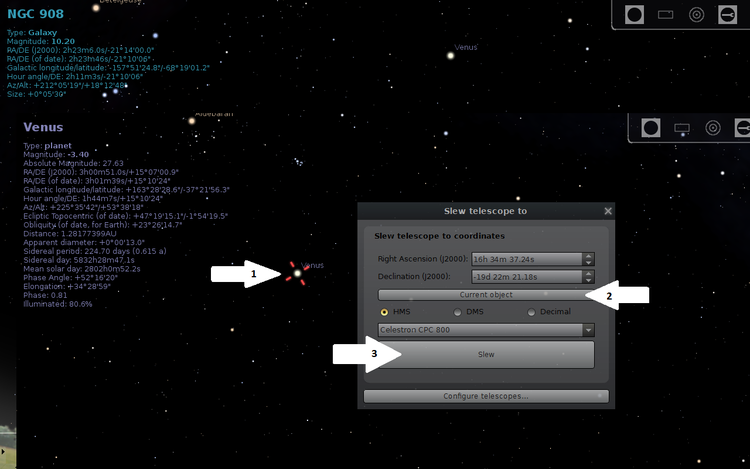
Now that the telescope is hooked up through Stellarium you should be able to see a little indicator which shows exactly where the telescope is currently pointing. Now you can point and click to various objects through Stellarium and get the telescope to slew to that object. To do this first click on an object you'd like to see. A little indicator should show up marking that you clicked on it. Then press "ctrl-0". A pop-up should appear. Click on "Current Object" and then on "Slew".

And now you have the telescope fully set-up with Stellarium! Good luck on your observing!


Observational Astronomy Spring 2015
This is a continuation of the Observational Astronomy project during spring term of 2015. Many of the instructions for the use of the telescope are the same, however some key parts have changed or are missing. The differences will be explained, meaning anything not mentioned is the same and the instructions above can just be followed.
The first main difference is that the eyepieces for the telescope are different. Like before you just need to attach the star diagonal that is mentioned above to the visual back (the hole on the back end of telescope). Once you put the eyepiece in the star diagonal slot, tighten the screw to fasten it. Below on the left are are the two new eyepieces for the telescope, they are both Celestron with 40mm and 30mm focal lengths. On the right is an image of the proper set up of the star diagonal attached to the visual back with the eyepiece screwed in.

The two new eyepieces, the 40 mm eyepiece on top and the 30 mm eyepiece below.

The 40 mm eyepiece slotted into to the star diagonal which is attached to the visual back, this is how the telescope needs to be set up for observation.


Observational Astronomy Spring 2016
Many of the instructions for setup are still the same but some hints for aligning the scope may be helpful. We have some new equipment too. We have a battery pack so we can take the telescope away from an outlet and we have a new camera that excels at deep sky photography.
To align the scope follow the instructions above making absolutely sure the base is level and stable. Once the telescope is mounted, power it on, wait for the GPS to sync, and choose the SkyAlign alignment option. SkyAlign uses three stars and the location given by GPS to figure out where the telescope is pointing. The first star is used by the scope to set the x-axis. The second star is used to set the y-axis and the third star is a check to make sure the first two are mapped correctly. Ideally the first two stars you pick will be low in the sky and about 90 degrees apart. The key to getting a successful alignment is making sure your stars are perfectly centered in the eyepiece. A trick for this is to get a star close to the center and then unfocus the telescope until the star is a large circle in the eyepiece. Once you do this it should be easier to get it perfectly centered. Take your time and get it right. Once you have the telescope aligned you can use either Stellarium or the handheld to select objects to view.
The new camera is a Celestron Nightscape 8300. To use you will have to install the Astro FX software on a computer and start it up. Plug in the cables to their respective places. You should hear the shutter on the camera click and the cooling fan should start automatically. Sometimes the program doesn't recognize the camera right away. If you unplug and plug the usb cable back in it should recognize it. Astroimaging is much easier when using the flip mirror so you can flip back and forth between an eyepiece and the camera.
The manual has a good description of focusing and snapping your first pictures but it doesn't talk about post-processing the images in Astro FX at all. There are guides online for how to get good astronomy pictures but here are the basics. With a telescope that is aligned well and tracking accurately you have two options for good pictures. You can take long exposures to see the detail in faint objects or you can take a bunch of short exposures and stack them. If the telescope isn't tracking well the only option you have is taking a bunch of photos and stacking them. Astro FX will align and stack photos for you. After the composite photo is stacked you can use Astro FX's editing tabs or move over to Photoshop/GIMP to adjust contrast and such.
Astro FX was frustrating to work with for me and doesn't have all the features I wanted so I used Maxim DL for stacking and post-processing. Otherwise Registax is a free and powerful program that does much more than Astro FX too.