Difference between revisions of "UV testing and Cutting Glass (Optional)"
Aplstudent (talk | contribs) (→Checking for Tempered Glass) |
Aplstudent (talk | contribs) (→Checking for Tempered Glass) |
||
| Line 8: | Line 8: | ||
Another way to tell is to check the edges of the glass. Tempered glass typically has very smooth, glossy edges while non tempered glass (annealed glass) may have rougher edges. | Another way to tell is to check the edges of the glass. Tempered glass typically has very smooth, glossy edges while non tempered glass (annealed glass) may have rougher edges. | ||
| − | [[File:]] | + | [[File:Glassedges.jpg]] |
If your glass does not have any of these indicating signs of being tempered, you should have a high level of confidence that your glass is not tempered. | If your glass does not have any of these indicating signs of being tempered, you should have a high level of confidence that your glass is not tempered. | ||
Revision as of 15:45, 2 March 2019
Cutting a piece of UV transparent glass becomes necessary when you do not have a piece of glass that will fit in the UV curing chamber and rest on top of your PCB during the UV curing process. You will need to find a piece glass, check that it is UV transparent (at least 60%) and make sure that the glass is not tempered. If the glass is not UV transparent the UV chamber will not evenly expose your photoresist. If the glass is tempered you will not be able to cut it effectively.
Checking for Tempered Glass
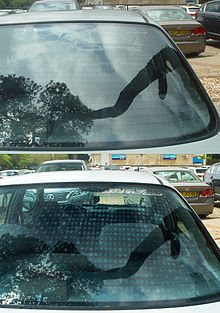
If you have glass that needs to be cut you will need to make sure it is not tempered. If you try to cut tempered glass, the cut will release internal tension and shatter the whole sheet of glass. Tempered glass will sometimes have small indications called "bugs' printed in the corner of the glass that will say "TEMP" or "TEMPERED". If your glass does not there are a few other indications of tempered glass. Viewing tempered at an glass through polarized sunglasses will reveal stress spots. These are frequently noticed in the tempered glass in car windows. The images below show a car window viewed without (the top image) and with (the bottom image) a polarizing filter.
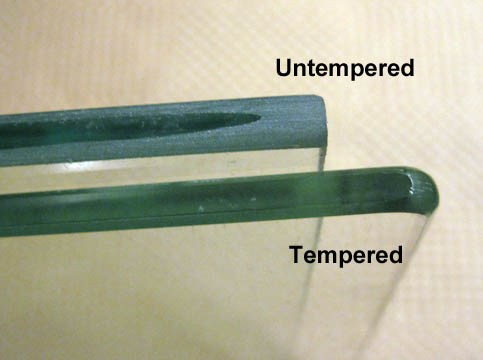
Another way to tell is to check the edges of the glass. Tempered glass typically has very smooth, glossy edges while non tempered glass (annealed glass) may have rougher edges.
If your glass does not have any of these indicating signs of being tempered, you should have a high level of confidence that your glass is not tempered.
Checking the Glass for UV Transparency
To check your sheet of glass for UV transparency you will need a 365 nm light source (like the UV curing chamber) and an optical power meter (OPM). Also be aware that 365 nm light can damage your eyes, so wear UV protective goggles. Place the light detecting head of the OPM in the UV curing chamber with an unobstructed view of the UV light source. Close the lid and turn on the chamber. Note the power output (turn the dial until the power output is roughly 0.3 mW). Now, without moving the OPM head (moving the head will change the power reading), place your glass directly on top of the head such that no light can enter the detector without passing through the glass. Again close the lid and note the power output. If the glass is UV transparent the power output should be roughly 60% of 0.3 mW or higher and this glass can be used.
Because the light from the UV curing chamber isn't completely uniform, you may want to test the transparency several times, especially if the glass is only slight less than 60% UV transparent.
Cutting the Glass
The best place to cut your glass is the UO Craft Center's glass shop.

